phina.jsとThree.jsの連携について
今回の記事は、phina.jsで用意されているThreeLayerクラスを使ってThree.jsとの連携をやっていこうと思います。もしphina.jsが分からない方は、[phina.js]基本 — テンプレートについてをご一読いただくことをおすすめいたします。また、今回はThree.jsも使うので、Three.jsがわからない方は(流石にいないか(^_^;))、他のThree.jsの入門サイト、公式サイト等でとりあえず触れるくらいになってから今回の記事をお読みいただくことをおすすめします。
ちなみに、私が勉強に利用させていただいた外部サイト様のリンクを張っておきますので、よろしければご参考までに。
※2018年9月19日 加筆・修正を行いました。
※2018年9月26日 加筆・修正を行いました。
※2018年10月18日 加筆・修正を行いました。
準備
なお、コーディングは、RunstantやRunstant liteを使って試されることをおすすめします。
とりあえず何もオブジェクト設置せずに連携だけやってみる
Three.jsと連携するには、phina.jsのThreeLayerクラスを使います。

一応注意。htmlファイルの方で、scriptタグでphina.jsと一緒にthree.jsを読み込むのをお忘れなく。
<script src='https://cdn.jsdelivr.net/gh/phi-jp/phina.js@0.2.3/build/phina.js'></script>
<script src="https://cdn.jsdelivr.net/gh/mrdoob/three.js@r96/build/three.min.js"></script>
jsファイルのソースコード
// グローバル領域に展開
phina.globalize();

const SCREEN_W = 640;
const SCREEN_H = 960;

/*
 * メインシーン
 */
phina.define("MainScene",{
  // 継承
  superClass:"DisplayScene",
  // コンストラクタ
  init: function(){
    // 親クラスの初期化
    this.superInit();

    // ThreeLayerの生成
    this.threeLayer = ThreeLayer({
      width: SCREEN_W,
      height: SCREEN_H
    }).addChildTo(this).setOrigin(0,0);
  },
  // 更新
  update: function(){

  },
});

/*
 * メイン処理
 */
phina.main(function(){
   // アプリケーションを生成
   var app = GameApp({
     // MainSceneから開始
     startLabel: "main",
   });
   // fps表示
   //app.enableStats();
   // 実行
   app.run();
});
何も目印になるようなオブジェクト生成してないので分かりずらいですが、これだけのコードでも、実はphina.jsとThree.jsの連携ができてます。
ThreeLayerクラスについて
公式で公開されているphina.jsのソースコードを見てみます。
phina.js/canvaslayer.js at develop – phinajs/phina.js – GitHub
Three.js分かる方なら、割とそのままなので説明なんて必要ない気がしますが、上記のリンク先のphina.display.ThreeLayer
というところを参考に、ThreeLayerクラスでデフォルトで用意されいているもの(状態?)を書き出してみます。
デフォルトで設定されているもの一覧
- this.scene
- new THREE.Scene()が入っています。
- this.camera
- new THREE.PerspectiveCamera( 75, options.width / options.height, 1, 1000 )が入っています。ここのoptions.widthやoptions.heightは、上のソースコードの例での
// ThreeLayerの生成
    this.threeLayer = ThreeLayer({
      width: SCREEN_W,
      height: SCREEN_H
    }).addChildTo(this).setOrigin(0,0);
この部分のThreeLayerの({…})で指定したwidthとheightがそのままこちらに指定されるようです。また、this.camera.position.z = 1000というふうにz座標だけ動かした位置にセットされているようです。
- this.light
- new THREE.DirectionalLight( 0xffffff, 1 )が入ってます。light.position.set( 1, 1, 1 ).normalize()となっているので、( 1, 1, 1 )の方向からの無限遠の平行光源がセットされているようです。sceneに追加済みの状態です。
- this.renderer
- new THREE.WebGLRenderer()が入ってます。this.renderer.setClearColor( 0xf0f0f0 )とあるので、0xf0f0f0の色でクリアして描画されているようです。this.renderer.setSize( options.width, options.height )とあるので、こちらも例のごとく、ThreeLayer生成時に設定したwidthとheightの値でサイズの設定をしているようです。
そして、最後の方にある、
this.on("enterframe",function() {
    this.renderer.render( this.scene, this.camera );
});
というところで、毎フレームごとのレンダリングの設定をして、
最後のthis.domElement = this.renderer.domElementでcanvasにレンダラーの描画を反映しているんだと思います。
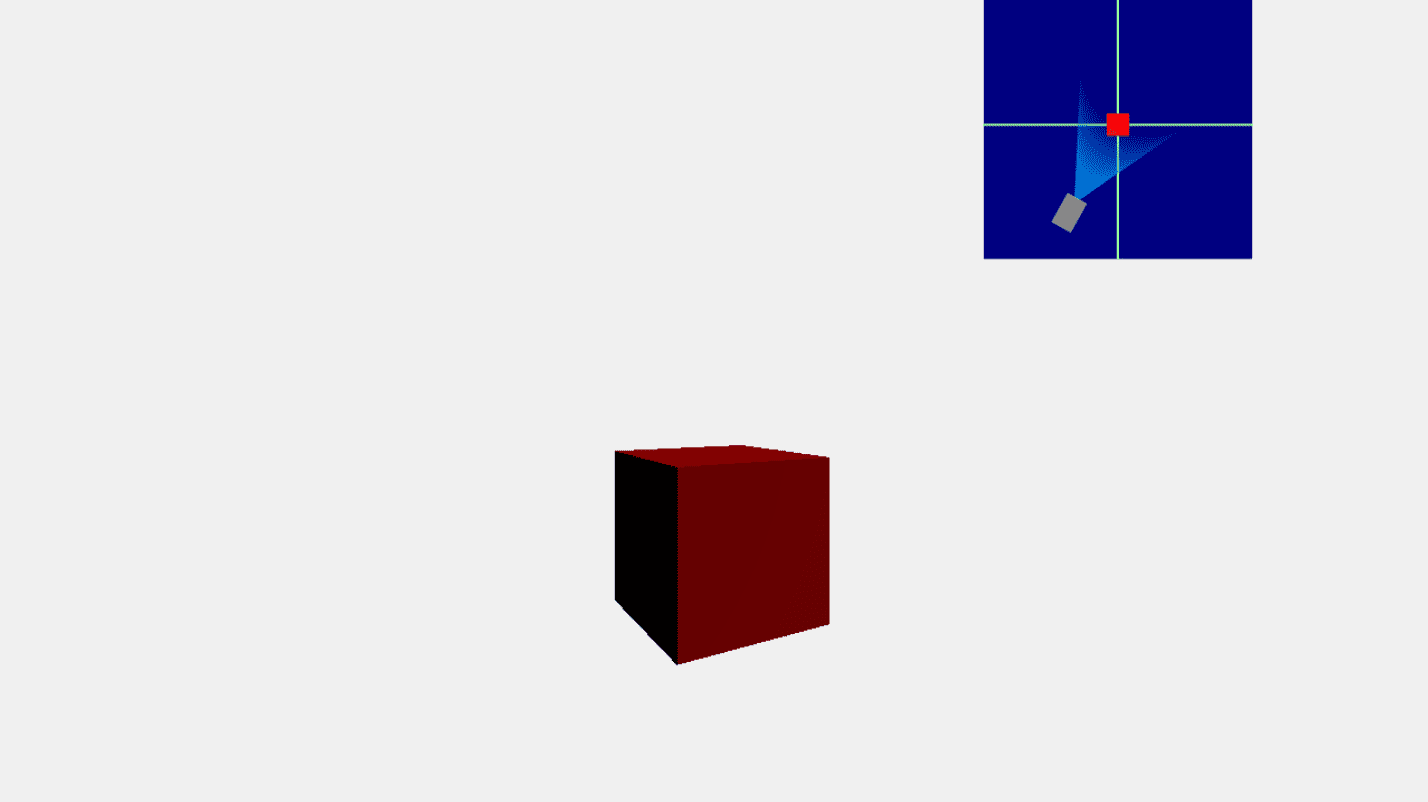
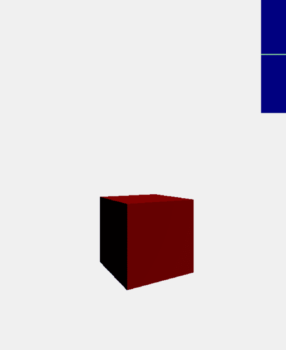
箱を描画してみる
箱を生成して、箱の周りをカメラがぐるぐる回るような感じで描画してみます。
ソースコード
/*
 * メインシーン
 */
phina.define("MainScene", {
    superClass: "DisplayScene",
    init: function () {
        this.superInit();

        // ThreeLayerの生成
        this.threeLayer = ThreeLayer({
            width: SCREEN_W,
            height: SCREEN_H
        }).addChildTo(this).setOrigin(0, 0);

        // 呼び出し簡略化用
        this.scene = this.threeLayer.scene;
        this.camera = this.threeLayer.camera;

        // 立方体オブジェクトを生成
        this.cube = new THREE.Mesh(
            // ジオメトリ
            new THREE.BoxGeometry(300, 300, 300),
            // マテリアル
            new THREE.MeshStandardMaterial({ color: 0xff0000, roughness: 1.0 })
        );
        this.cube.position.set(0, -250, 0);
        this.scene.add(this.cube);

        // カメラカウント用
        this.count = 0;

        // 更新
        this.on("enterframe", function () {
            this.count = (this.count++ === 360) ? 0 : this.count++;
            const x = Math.sin(Math.PI * this.count / 180) * 1000;
            const z = Math.cos(Math.PI * this.count / 180) * 1000;

            this.camera.position.set(x, 0, z);
            this.camera.lookAt(0, 0, 0);
        });

        // 座標表示 //////////////////////////
        // 座標系
        const coordinate = RectangleShape({
            width: 240,
            height: 240,
            fill: "navy",
            stroke: null
        }).addChildTo(this)
            .setPosition(this.gridX.span(12.5), this.gridY.span(2.5));

        // 座標のX・Z軸
        PathShape({
            stroke: "hsla(120,100%,80%,1)",
            strokeWidth:2,
            paths:[Vector2(-120, 0),Vector2(120, 0)]
        }).addChildTo(coordinate);
        PathShape({
            stroke: "hsla(120,100%,80%,1)",
            strokeWidth: 2,
            paths: [Vector2(0, -120), Vector2(0, 120)]
        }).addChildTo(coordinate);

        // 立方体の座標
        RectangleShape({
            width: 20,
            height: 20,
            fill: "red",
            stroke: null
        }).addChildTo(this)
            .setPosition(this.gridX.span(12.5), this.gridY.span(2.5));

       // カメラの視界
       const viewField = CircleShape({
           radius: 100,
           rotation: -90,
           stroke: null
       }).addChildTo(this)
           .setPosition(this.gridX.span(12.5), this.gridY.span(2.5));
       // 視界領域を表現
       const grad = this.canvas.context.createRadialGradient(-80, 0, 0, 65, 0, 65);
       grad.addColorStop(0, "hsla(200,100%,50%,1.0)");
       grad.addColorStop(1, "hsla(200,100%,50%,0.0)");
       viewField.fill = grad;

       // カメラポジション座標
       RectangleShape({
           width:30,
           height: 20,
           fill: "#888",
           stroke:null
       }).addChildTo(viewField)
           .setPosition(-90, 0);

       // 参照用
       this.viewField = viewField;
    },
    // 更新
    update: function () {
        // カメラと視界の座標更新
        this.viewField.rotation = -this.count - 90;
    }
});
Three.jsでのオブジェクトの追加方法と特に変わらず、scene.add(オブジェクト)のような感じで箱を追加しています。
そして、phina.jsの方の図形オブジェクトなども一緒に描画できます。今回は上から見た座標を表現してみました。(結構大雑把なので細かいところは目を瞑っていただけると有難いです(^_^;))
あと、更新処理についてなのですが、上のソースコードではThree.jsの更新はthis.on(“enterframe”,function(){…});内で処理を書いてますが、update:function(){…}の中にまるまる移動させて、
// 更新
  update: function(){
      this.count = (this.count++ === 360) ? 0 : this.count++;
      const x = Math.sin(Math.PI * this.count / 180) * 1000;
      const z = Math.cos(Math.PI * this.count / 180) * 1000;

      this.camera.position.set(x,0,z);
      this.camera.lookAt(0,0,0);


      // カメラの座標更新
      this.viewField.rotation = -this.count - 90;
  },
としても反映されました。たぶん好みでどちらに更新の処理を書いても良いかと思います。
ここまで読んでくださり、ありがとうございました!ご意見・ご感想、または、ここ間違ってるよ!とか、こここうした方が良いよ!とかございましたら、お手数ですが、twitterか当サイトのコメント欄からお願いしますm(_ _)m
参考にさせていただいたサイト・ページ一覧
phina.js/canvaslayer.js at develop – phinajs/phina.js – GitHub
国産ゲームライブラリ「phina.js」で3Dゲーム作ろうぜ!
phina.jsでレイヤーと仲良くなろう|daishi blog
phina.js + three.jsでモーションコントローラー作った|daishi blog
関連記事:
 [phina.js] フレーム数、経過時間計測、シーン生成・消去、dat.GUIについて
 [phina.js] マウス・タッチ・キー入力取得 マルチタッチ入力(touchList・pointers)編
 [phina.js] マウス・タッチ・キー入力取得 基本編
 [phina.js]オブジェクトの操作 -位置、移動、衝突・クリック判定など- について
 [phina.js] サウンドの操作について
 [phina.js] マウス・タッチ・キー入力取得 Accessory系(ドラッグ・フリック)編
 [phina.js] PathShapeについて
 [phina.js] マウス・タッチ・キー入力取得 入力の種類と座標取得編
 phina.jsでキャラクターの各部位を動かす方法
 [phina.js]クイズゲームの作り方