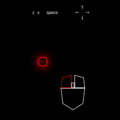
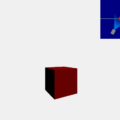
![[phina.js] マウス・タッチ・キー入力取得 Accessory系(ドラッグ・フリック)編](https://horohorori.com/wp-content/uploads/2018/10/draggable_sample-36-2-1.png)
![[phina.js] マウス・タッチ・キー入力取得 Accessory系(ドラッグ・フリック)編](https://horohorori.com/wp-content/uploads/2018/10/draggable_sample-36-2-1-286x350.png)
[phina.js] マウス・タッチ・キー入力取得 Accessory系(ドラッグ・フリック)編
今回の記事は、phina.jsのAccessoryで用意されているドラッグ・フリック入力取得の方法を書いていきたいと思います。他にも入力取得に関する記事を書いておりますので、よろしければご覧ください。
関連記事:
[phina.js] マウス・タッチ・キー入力取得 基本編
[phina.js] マウス・タッチ・キー入力取得 入力の種類と座標取得編
[phina.js] マウス・タッチ・キー入力取得 マルチタッチ入力(touchList・pointers)編
もしphina.jsが分からない方は、[phina.js]基本 — テンプレートについてをご一読いただくことをおすすめいたします。
※2018年10月15日 加筆・修正を行いました。
※2018年10月18日 加筆・修正を行いました。
準備
コーディングは、RunstantやRunstant liteを使って試されることをおすすめします。
一応雛型として置いておきます。
<script src='https://cdn.jsdelivr.net/gh/phi-jp/phina.js@0.2.3/build/phina.js'></script>// グローバル領域に展開
phina.globalize();
/*
* メインシーン
*/
phina.define("MainScene",{
// 継承
superClass:"DisplayScene",
// コンストラクタ
init: function(){
// 親クラスの初期化
this.superInit();
// ここに処理を書く
},
// 更新
update: function(){
},
});
/*
* メイン処理
*/
phina.main(function(){
// アプリケーションを生成
const app = GameApp({
// MainSceneから開始
startLabel: "main",
});
// fps表示
//app.enableStats();
// 実行
app.run();
});そして、適当に矩形オブジェクトを用意します。
// 矩形オブジェクト
this.rect = RectangleShape().addChildTo(this)
    .setPosition(this.gridX.center(),this.gridY.center());
ドラッグ
Draggableクラスで設定できます。
// Draggableクラスを矩形オブジェクトに紐づけ
this.rect.draggable;
ただドラッグを有効化させるにはこれだけで済んじゃいます。
プロパティ
| プロパティ名 | 説明 | デフォルト値 |
|---|---|---|
| initialPosition | ドラッグされている位置 | phina.geom.Vector2(0, 0); |
メソッド
- back([time, easing])
- ドラッグ時のオブジェクトの動作の種類を設定できます。
[引数]
time: 動作の速さをミリ秒単位の数値で指定します。省略可能です。
easing: 動作の種類を指定できます。動作の種類は、jQuery Easing – jQuery 日本語リファレンスのページにあるものを指定できるようです。デフォルト値は’easeOutElastic’です。こちらも省略可能です。
ドラッグのbackメソッドを使ったサンプル
backメソッドで、ドラッグしたときの動きを設定できるようですので、ちょっと私のやり方なのですが(もっといい方法ありそう)、使用例にサンプルを作ってみました。
ソースコード
/*
* メインシーン
*/
phina.define("MainScene", {
superClass: "DisplayScene",
init: function () {
this.superInit();
// 背景色
this.backgroundColor = "black";
// 矩形オブジェクト
this.rect = RectangleShape({
fill: null,
stroke: "#4ff"
}).addChildTo(this)
.setPosition(this.gridX.center(), this.gridY.center());
// ドラッグ有効化
this.rect.draggable;
// ドラッグされている位置の初期化
this.initialPosition = this.rect.draggable.initialPosition;
this.initialPosition.x = this.rect.x;
this.initialPosition.y = this.rect.y;
// ドラッグ動作の種類
this.easingMode = "easeOutElastic";
const self = this;
/*
*ドラッグ動作の種類変更ボタン
*/
// easeOutElastic
this.mode1btn = RectangleShape({
width: 240,
height: 100,
fill: null,
stroke: "white",
strokeWidth: 8
}).addChildTo(this).setPosition(this.gridX.span(4), 50);
Label({
text: "easeOutElastic",
fill: "white"
}).addChildTo(this.mode1btn);
// クリック有効化
this.mode1btn.setInteractive(true);
this.mode1btn.onpointend = function () {
self.easingMode = "easeOutElastic";
};
// linear
this.mode2btn = RectangleShape({
width: 100,
height: 100,
fill: null,
stroke: "white",
strokeWidth: 8
}).addChildTo(this).setPosition(this.gridX.span(9), 50);
Label({
text: "linear",
fill: "white"
}).addChildTo(this.mode2btn);
// クリック有効化
this.mode2btn.setInteractive(true);
this.mode2btn.onpointend = function () {
self.easingMode = "linear";
};
// easeInExpo
this.mode3btn = RectangleShape({
width: 190,
height: 100,
fill: null,
stroke: "white",
strokeWidth: 8
}).addChildTo(this).setPosition(this.gridX.span(13), 50);
Label({
text: "easeInExpo",
fill: "white"
}).addChildTo(this.mode3btn);
// クリック有効化
this.mode3btn.setInteractive(true);
this.mode3btn.onpointend = function () {
self.easingMode = "easeInExpo";
};
},
// 更新
update: function (app) {
// タッチ・カーソルの位置を取得
const p = app.pointer;
// ボタンの位置でない場所がタッチ・クリックされた場合
if (p.getPointing() && p.y > 100) {
this.rect.draggable.back(120, this.easingMode);
// ドラッグされている場所を更新
this.initialPosition.x = p.x;
this.initialPosition.y = p.y;
}
this.mode1btn.stroke = (this.easingMode === "easeOutElastic") ? "#4ff" : "white";
this.mode2btn.stroke = (this.easingMode === "linear") ? "#4ff" : "white";
this.mode3btn.stroke = (this.easingMode === "easeInExpo") ? "#4ff" : "white";
}
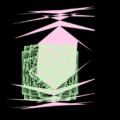
});補足: backメソッドをただ設定したら、プログラムを実行した時に、触ってもいないのに(0, 0)の座標に飛んでっちゃう上、飛んでった後にドラッグしても、timeにした指定も反映されてなさそうですし、easingも指定した動作じゃなく、デフォルトの’easeOutElastic’のような動作しかしなかったので、多分、backメソッドが一回で解除されてしまうのかな(^_^;)?と思い、試行錯誤の末、作れた一応それっぽい動きするものです。ちょっとややこしいコードになってしまいましたが、参考までに載せておきます。
イベント登録
Draggableを紐づけされているオブジェクトにドラッグに関するイベントを設定できます。
- ondrag
- ドラッグ時のイベントを登録できます。
- ondragstart
- ドラッグ開始時のイベントを登録できます。
- ondragend
- ドラッグ終了時のイベントを登録できます。
ドラッグ各イベント登録のサンプル
ソースコード
/*
 * メインシーン
 */
phina.define("MainScene", {
    superClass: "DisplayScene",
    init: function () {
        this.superInit();

        this.backgroundColor = "black";
        // 矩形オブジェクト
        this.rect = RectangleShape({
            fill: null,
            stroke: "white"
        }).addChildTo(this)
            .setPosition(this.gridX.center(), this.gridY.center());

        // ドラッグ有効化
        this.rect.draggable;

        // ドラッグ開始時
        this.rect.ondragstart = () => {
            this.rect.strokeWidth = 8;
        };
        // ドラッグ中
        this.rect.ondrag = () => {
            // 矩形生成
            this.createRect(this.rect.x, this.rect.y);
        };
        // ドラッグ終了時
        this.rect.ondragend = () => {
            this.rect.strokeWidth = 4;
        };
    },
    // 矩形生成
    createRect: function (x, y) {
        const rect = RectangleShape({
            x: x,
            y: y,
            fill: null,
            stroke: "white"
        }).addChildTo(this);
        // 透明化
        rect.alpha = 0;

        //更新
        rect.update = () => {
            // 少しずつ大きく
            rect.scaleX += 1;
            rect.scaleY += 1;
            // 少しずつ不透明に
            rect.alpha += 0.1;
            // 完全に不透明になったら消す
            if (rect.alpha >= 1) {
                rect.remove();
            }
        };
    }
});
フリック
Flickableクラスを使って設定できます。
// Flickableクラスを矩形オブジェクトに紐づけ
this.rect.flickable;
こちらも、ただフリックを有効化させるにはこれだけで済んじゃいます。
プロパティ
| プロパティ名 | 説明 | デフォルト値 |
|---|---|---|
| initialPosition | フリック入力開始位置 | phina.geom.Vector2(0, 0) |
| friction | フリック入力に対する反応の感度 | 0.9 |
| velocity | オブジェクトを動かすベクトル | phina.geom.Vector2(0, 0) |
| vertical | yの方向への移動を有効にするか | true |
| horizontal | xの方向への移動を有効にするか | true |
| cacheList | 入力されたベクトルを3つまで配列の形で保管している | [] |
メソッド
- cancel()
- 名前の通り、フリック入力をキャンセルします。
イベント登録
Flickableを紐づけされているオブジェクトにフリックに関するイベントを設定できます。こちらの場合は、オブジェクトに直接ではなく、flickableを介してしか登録できないようです。
- onflickstart
- フリック開始時のイベントを登録できます。
- onflickcancel
- フリックしなかった時のイベントを登録できます。
// フリック開始時
this.rect.flickable.onflickstart = () => {
// ここに処理を書く
};
// フリックしなかった時
this.rect.flickable.onflickcancel = () => {
// ここに処理を書く
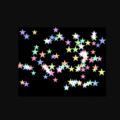
};フリックのサンプル
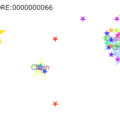
思いっきりコレの使いまわしですが、縦方向だけの移動に制限し、フリックキャンセルしたら星が全部消えるようにしてみました。
ソースコード
/*
 * メインシーン
 */
phina.define("MainScene", {
    superClass: "DisplayScene",
    init: function () {
        this.superInit();

        // 背景色
        this.backgroundColor = "black";

        // プレイヤー
        this.player = RectangleShape({
            width: 20,
            height: 20,
            fill: "gray",
            stroke: null
        }).addChildTo(this).setPosition(this.gridX.center(), this.gridY.center());
        this.flick = this.player.flickable;
        this.flick.horizontal = false;

        // 星オブジェクトのグループ
        this.starGroup = DisplayElement().addChildTo(this);

        // フリックをキャンセルしたら、星のオブジェクトを全部消す
        this.flick.onflickcancel = () => {
            this.starGroup.children.clear();
        };
    },
    // 更新
    update: function () {
        if (this.player.y <= -10) {
            this.player.y = 960;
        } else if (this.player.y >= 970) {
            this.player.y = 0;
        }

        // フリックの強さ
        const len = Math.floor(this.flick.velocity.y);

        if (len > 20 || len < -20) {
            // フリックの方向
            const deg = (len < 0) ? 90 : 270;

            this.createStar(Math.abs(len), deg, 320, this.player.y);
        }
    },
    // 星の生成
    createStar: function (len, deg, x, y) {
        (len - 20).times(() => {
            const star = StarShape({
                fill: "hsla({0},100%,80%,1)".format(Math.randint(0, 360)),
                stroke: null,
                radius: Math.randint(20, 30)
            }).addChildTo(this.starGroup).setPosition(x, y);
            star.blendMode = "lighter";

            // 毎フレームごとに動くベクトルのセット
            star.physical.velocity.x = Math.cos(Math.PI * (deg + Math.randint(-30, 30)) / 180)
                * Math.randint(len / 5, len / 2);
            star.physical.velocity.y = Math.sin(Math.PI * (deg + Math.randint(-30, 30)) / 180)
                * Math.randint(len / 5, len / 2);

            // 画面外に出たら消す
            star.update = () => {
                if (star.x <= -15 || star.x >= 655
                    || star.y <= -15 || star.y >= 975) {
                    star.remove();
                }
            };
        });
    }
});
他にも入力取得に関する記事を書いておりますので、よろしければご覧ください。
[phina.js] マウス・タッチ・キー入力取得 基本編
[phina.js] マウス・タッチ・キー入力取得 入力の種類と座標取得編
[phina.js] マウス・タッチ・キー入力取得 マルチタッチ入力(touchList・pointers)編
ご意見・ご感想、また、ここ間違ってるよとか、もっといい方法あるよといったご指摘などございましたら、お手数ですがコメント欄や当twitterアカウントへお願いしますm(_ _)m
参考にさせていただいたサイト・ページ一覧
phina.js/draggable.js at develop – phinajs/phina.js – GitHub
phina.js/flickable.js at develop – phinajs/phina.js – GitHub
jQuery Easing – jQuery 日本語リファレンス
phina.jsでアクセサリを使ってみよう&作ってみよう!
phina.jsのイベント一覧
関連記事:
 [phina.js] マウス・タッチ・キー入力取得 基本編
 [phina.js] マウス・タッチ・キー入力取得 入力の種類と座標取得編
 [phina.js] マウス・タッチ・キー入力取得 マルチタッチ入力(touchList・pointers)編
 [phina.js]基本 — 色んな図形オブジェクトについて
 [phina.js] サウンドの操作について
 phina.jsとThree.jsの連携について
 [phina.js]オブジェクトの操作 -位置、移動、衝突・クリック判定など- について
 [phina.js] フレーム数、経過時間計測、シーン生成・消去、dat.GUIについて
 [phina.js] PathShapeについて
 [phina.js] 探索・脱出ゲームの作り方