![[phina.js] マウス・タッチ・キー入力取得 基本編](https://horohorori.com/wp-content/uploads/2018/09/key_mouse_sample2-2-23-2.png)
![[phina.js] マウス・タッチ・キー入力取得 基本編](https://horohorori.com/wp-content/uploads/2018/09/key_mouse_sample2-2-23-2-286x350.png)
今回の記事は、phina.jsでのマウス・タッチ・キー入力の取得方法について書いていきたいと思います。もしphina.jsが分からない方は、[phina.js]基本 — テンプレートについてをご一読いただくことをおすすめいたします。
入力取得に関する記事を他にも書いていますので、よろしければご一緒にどうぞ!
[phina.js] マウス・タッチ・キー入力取得 入力の種類と座標取得編
[phina.js] マウス・タッチ・キー入力取得 Accessory系(ドラッグ・フリック)編
[phina.js] マウス・タッチ・キー入力取得 マルチタッチ入力(touchList・pointers)編
※2018年10月15日 加筆・修正を行いました。
※2018年10月18日 加筆・修正を行いました。
準備
コーディングは、RunstantやRunstant liteを使って試されることをおすすめします。
一応雛型として置いておきます。
<script src='https://cdn.jsdelivr.net/gh/phi-jp/phina.js@0.2.3/build/phina.js'></script>// グローバル領域に展開
phina.globalize();
/*
* メインシーン
*/
phina.define("MainScene",{
// 継承
superClass:"DisplayScene",
// コンストラクタ
init: function(){
// 親クラスの初期化
this.superInit();
// ここに処理を書く
},
// 更新
update: function(){
},
});
/*
* メイン処理
*/
phina.main(function(){
// アプリケーションを生成
const app = GameApp({
// MainSceneから開始
startLabel: "main",
});
// fps表示
//app.enableStats();
// 実行
app.run();
});クリック・タッチ入力、カーソル・タッチの座標 その1
まず適当にMainSceneのinitの中に、矩形をを用意します。
this.pointer = RectangleShape({
        stroke: "black",
        strokeWidth: 4,
        fill: null,
        width: 20,
        height: 20
    }).addChildTo(this);
2つクリック・タッチ入力を取得する方法があって、まずはオブジェクト自体にイベントを登録してクリック・タッチ入力を取得する方法を紹介します。それにはまず、オブジェクトにsetInteractive(true)をしなければ受け付けてもらえません。
this.pointer.setInteractive(true);それからオブジェクトにイベントを登録します。クリック・タッチ入力があった時矩形を赤くし、入力がない時黒くする場合、下のようになります。
this.pointer.onpointstart = () => {
    this.pointer.stroke = "red";
};

this.pointer.onpointend = () => {
    this.pointer.stroke = "black";
};
オブジェクトに登録できるイベント一覧を紹介します。
クリック・タッチイベント
- onpointstart
- マウスダウンした瞬間か、タッチスタートした瞬間に発火します。
- onpointend
- マウスアップした瞬間か、タッチエンドした瞬間に発火します。
- onpointmove
- マウスダウンしながら動かしている間か、タッチしながら動かしている間に発火します。
- onpointstay
- マウスを押し続けている間か、タッチし続けている間に発火します。
- onpointover
- カーソルが上に来た瞬間か、タッチした瞬間に発火します。
- onpointout
- カーソルが上から外れた瞬間か、タッチが外れた瞬間に発火します。
クリックイベント
- onclick
- クリックした瞬間に発火します。
ちなみに、このイベントは、シーン自体にも登録できます。シーン自体にイベント登録して、クリック・タッチ入力があった座標に矩形を移動する場合、下のようになります。シーン自体は最初からinteractiveがtrueになっているので、setInteractive(true)する必要はありません。
this.onpointstay = (e) => {
    this.pointer.x = e.pointer.x;
    this.pointer.y = e.pointer.y;
};
クリック・タッチ入力、カーソル・タッチの座標 その2
前項で利用したような、カーソルやタッチの位置を示す目印となる矩形をを用意します。
そして、updateメソッドの引数にappを格納して、カーソルやタッチの座標を取得する準備をします。ちなみにこのappは、上の雛型のメイン処理でGameAppを格納しているappです。
// 更新
update: function (app) {
    // 処理
}
updateメソッドの中で、
const p = app.pointer;
this.pointer.setPosition(p.x, p.y);
とすれば、矩形がマウスカーソルか、タッチしている座標のところへ移動します。
クリックかタッチの入力は、p.getPointing()で取得できます。これを呼びだして返された値がtrueであれば、クリック・タッチ入力があったということになります。例えば、クリック・タッチ入力があった時、矩形を赤くする場合、
this.pointer.stroke = (p.getPointing()) ? "red" : "black";のように使います。
マウスの各ボタンの入力
前項の『クリック・タッチ入力、カーソル・タッチの座標 その2』で説明したクリックは実は左クリックだけしか反応してくれません。
なので、ほかのマウスのボタンからのクリック入力を取得するには、
const m = app.mouse;
const right = m.getButton("right");   // 右クリック
const left = m.getButton("left");     // 左クリック
const middle = m.getButton("middle"); // マウスホイールクリック
この様にして取得します。こちらでも、各変数に返された値がtrueであれば、入力があったということになります。
キー入力
ここまで来ればだいたい想像がつくかと思いますが、たとえば、zキーの入力を取得する場合、
const key = app.keyboard;
const z = key.getKey("z");
というように取得します。
※この記事の後日、更に詳しく書いてみた記事のご紹介:
[phina.js] マウス・タッチ・キー入力取得 入力の種類と座標取得編
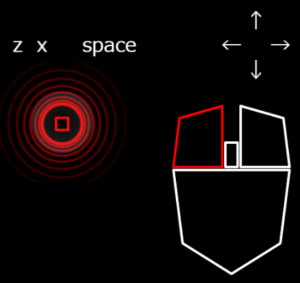
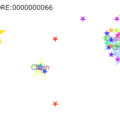
サンプル
簡単ですが、サンプルを作ってみました。
ソースコード
htmlファイル
<!doctype html>

<html>
  <head>
    <meta charset="utf-8" />
    <meta name="viewport" content="width=device-width, user-scalable=no" />
    <meta name="apple-mobile-web-app-capable" content="yes" />
    <title></title>
  </head>
  <body oncontextmenu="return false">
      <script src='https://cdn.jsdelivr.net/gh/phi-jp/phina.js@0.2.3/build/phina.js'></script>
      <script src="script.js"></script>
  </body>
</html>ちょっと補足です。htmlファイルで、<body oncontextmenu="return false">としているのは、
右クリック時にメニューを表示させないようにするためです。
jsファイル
phina.globalize();

const W_HALF = 320; // スクリーン横幅の半分
const H_HALF = 480; // スクリーン高さの半分

phina.define("MainScene", {
    // 継承
    superClass: "DisplayScene",
    // コンストラクタ
    init: function () {
        // 親クラスの初期化
        this.superInit();

        // 背景の色
        this.backgroundColor = "black";

        // 左クリック用
        this.left = PathShape({
            stroke: "white",
            paths: [
                Vector2(400, 600),
                Vector2(400, 700),
                Vector2(320, 700),
                Vector2(330, 620),
                Vector2(400, 600)
            ]
        }).addChildTo(this);

        // 右クリック用
        this.right = PathShape({
            stroke: "white",
            paths: [
                Vector2(430, 600),
                Vector2(430, 700),
                Vector2(510, 700),
                Vector2(500, 620),
                Vector2(430, 600)
            ]
        }).addChildTo(this);

        // ホイール用
        this.middle = RectangleShape({
            stroke: "white",
            strokeWidth: 4,
            fill: null,
            width: 20,
            height: 40
        }).addChildTo(this).setPosition(415, 680);

        // マウス下半分用
        PathShape({
            stroke: "white",
            paths: [
                Vector2(320, 705),
                Vector2(510, 705),
                Vector2(495, 825),
                Vector2(415, 875),
                Vector2(335, 825),
                Vector2(320, 705)
            ]
        }).addChildTo(this);

        // マウスカーソルの位置用
        this.pointer = RectangleShape({
            stroke: "white",
            strokeWidth: 4,
            fill: null,
            width: 20,
            height: 20
        }).addChildTo(this);

        // 文字キー用
        this.zLabel = Label({
            text: "z",
            fill: "white"
        }).addChildTo(this).setPosition(100, 100);
        this.xLabel = Label({
            text: "x",
            fill: "white"
        }).addChildTo(this).setPosition(140, 100);

        // スペースキー用
        this.spaceLabel = Label({
            text: "space",
            fill: "white"
        }).addChildTo(this).setPosition(250, 100);

        // 各方向キー用
        this.leftLabel = Label({
            text: "←",
            fill: "white"
        }).addChildTo(this).setPosition(450, 100);
        this.upLabel = Label({
            text: "↑",
            fill: "white"
        }).addChildTo(this).setPosition(490, 60);
        this.rightLabel = Label({
            text: "→",
            fill: "white"
        }).addChildTo(this).setPosition(530, 100);
        this.downLabel = Label({
            text: "↓",
            fill: "white"
        }).addChildTo(this).setPosition(490, 140);
    },
    // 更新
    update: function (app) {
        // マウスカーソルかタッチの位置取得
        const p = app.pointer;
        this.pointer.setPosition(p.x, p.y);

        // 各クリックの取得
        const m = app.mouse;
        const right = m.getButton("right");
        const left = m.getButton("left");
        const middle = m.getButton("middle");

        // クリックされていたら対応するボタンを赤くする
        this.right.stroke = (right) ? "red" : "white";
        this.left.stroke = (left) ? "red" : "white";
        this.middle.stroke = (middle) ? "red" : "white";

        // クリックかタッチされていた場合、ポインターの色も赤くする
        this.pointer.stroke = (right || left || middle || p.getPointing()) ? "red" : "white";
        // 左クリックかタッチされていた場合、赤い波紋を作る
        if (p.getPointing()) {
            this.touchCircle(p.x, p.y);
        }

        // キー入力取得
        const key = app.keyboard;
        // 各キーを押したとき、文字の色を赤くする
        this.zLabel.fill = (key.getKey("z")) ? "red" : "white";
        this.xLabel.fill = (key.getKey("x")) ? "red" : "white";
        this.spaceLabel.fill = (key.getKey("space")) ? "red" : "white";

        this.leftLabel.fill = (key.getKey("left")) ? "red" : "white";
        this.upLabel.fill = (key.getKey("up")) ? "red" : "white";
        this.rightLabel.fill = (key.getKey("right")) ? "red" : "white";
        this.downLabel.fill = (key.getKey("down")) ? "red" : "white";
    },
    // 赤い波紋
    touchCircle: function (x, y) {
        // 波紋の円を作る
        const circle = CircleShape({
            fill: null,
            stroke: "red",
            strokeWidth: 4
        }).addChildTo(this).setPosition(x, y);
        // 消滅させるまでのカウンタ
        circle.count = 0;

        // 波紋の更新
        circle.update = () => {
            circle.count++;
            // 徐々に透明にさせる
            circle.alpha -= 0.1;
            // 徐々に半径を広げる
            circle.radius += circle.count * 2;
            // カウントが10になったら自身を消す
            if (circle.count === 10) {
                circle.remove();
            }
        };
    }
});

/*
 * メイン処理
 */
phina.main(function () {
    // アプリケーションを生成
    const app = GameApp({
        // MainSceneから開始
        startLabel: "main"
    });
    // fps表示
    //app.enableStats();
    // 実行
    app.run();
});
入力取得に関する記事は他にもありますのでよろしければどうぞ!
[phina.js] マウス・タッチ・キー入力取得 入力の種類と座標取得編
[phina.js] マウス・タッチ・キー入力取得 Accessory系(ドラッグ・フリック)編
[phina.js] マウス・タッチ・キー入力取得 マルチタッチ入力(touchList・pointers)編
ご意見・ご感想、また、ここ間違ってるよとか、もっといい方法あるよといったご指摘などございましたら、お手数ですがコメント欄や当twitterアカウントへお願いしますm(_ _)m
参考にさせていただいたサイト・ページ一覧
[phina.js]サンプルから覚えるphina.js
phina.jsのイベント一覧
[phina.js-Tips-31] タッチしている位置にSpriteを移動させる
[phina.js-Tips-029] Spriteをキーボードで操作する
クリック取得 | Runstant
関連記事:
 [phina.js] マウス・タッチ・キー入力取得 入力の種類と座標取得編
 [phina.js] マウス・タッチ・キー入力取得 Accessory系(ドラッグ・フリック)編
 [phina.js] マウス・タッチ・キー入力取得 マルチタッチ入力(touchList・pointers)編
 [phina.js] PathShapeについて
 phina.jsとThree.jsの連携について
 [phina.js]基本 — 色んな図形オブジェクトについて
 [phina.js] サウンドの操作について
 [phina.js]オブジェクトの操作 -位置、移動、衝突・クリック判定など- について
 [phina.js] 探索・脱出ゲームの作り方
 [phina.js]基本 — テンプレートについて