![[phina.js] フレーム数、経過時間計測、シーン生成・消去、dat.GUIについて](https://horohorori.com/wp-content/uploads/2018/10/spiral_line_sample-96-2.png)
![[phina.js] フレーム数、経過時間計測、シーン生成・消去、dat.GUIについて](https://horohorori.com/wp-content/uploads/2018/10/spiral_line_sample-96-2-286x350.png)
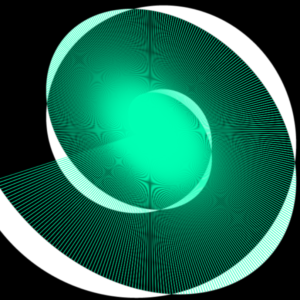
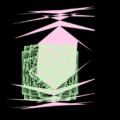
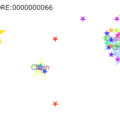
今回の記事は、phina.jsでのフレーム数や、経過時間計測、シーン生成・消去、それと、dat.GUIを使う方法をについてを書いていきたいと思います。もしphina.jsが分からない方は、[phina.js]基本 — テンプレートについてをご一読いただくことをおすすめいたします。
準備
コーディングは、RunstantやRunstant liteを使って試されることをおすすめします。
一応雛型として置いておきます。
<script src='https://cdn.jsdelivr.net/gh/phi-jp/phina.js@0.2.3/build/phina.js'></script>// グローバル領域に展開
phina.globalize();
/*
* メインシーン
*/
phina.define("MainScene",{
// 継承
superClass:"DisplayScene",
// コンストラクタ
init: function(){
// 親クラスの初期化
this.superInit();
// ここに処理を書く
},
// 更新
update: function(){
},
});
/*
* メイン処理
*/
phina.main(function(){
// アプリケーションを生成
const app = GameApp({
// MainSceneから開始
startLabel: "main",
});
// fps表示
//app.enableStats();
// 実行
app.run();
});BaseAppクラスについて
phina.jsを扱うにあたってメイン処理のところで、毎回お世話になっているGameAppクラスですが、そのGameAppクラスが継承しているBaseAppクラスを読み解きつつ、フレーム数や、経過時間、シーン生成と消去と、phina.jsでのdat.GUIの使い方などについて書いていきたいと思います。
プロパティ
| プロパティ名 | 説明 | デフォルト値 |
|---|---|---|
| awake | updateをしているかが真偽値で入る。していればtrue。 | null |
| fps | 1秒間のフレーム数が入る。 | null |
| frame | 現在のフレーム数が入る。 | null |
| currentScene | 現在のシーンが入る。 | this._scenes[this._sceneIndex] |
| rootScene | これに関してはよくわかりませんでした。すみません。 | this._scenes[0] |
| deltaTime | 1フレームにかかったミリ秒数が入る。 | this.ticker.deltaTime |
| elapsedTime | シーンが始まってからの経過ミリ秒数が入る。 | this.ticker.elapsedTime |
| currentTime | 1970年01月01日 00:00:00 UTC からその時点までのミリ秒数(Unixエポック)が入る。 | this.ticker.currentTime |
| startTime | シーンが始まった時刻のUnixエポックが入る。 | this.ticker.startTime |
メソッド
- run()
- アプリケーションを実行します。
- replaceScene(scene)
- シーンを変更します。
[引数]
scene: 実行中のシーンから変更したいシーンを指定します。 - pushScene(scene)
- シーンを新しく生成します。
replaceSceneとの違いは、replaceSceneはシーン遷移で、
pushSceneは現在のシーンを一時停止して、一時的な新しいシーンを生成する、みたいな感じみたいです。
一時停止等で使うのが良いと思います。[引数]
scene: 新しく生成したいシーンを指定します。 - popScene()
- 現在実行中のシーンを消します。
一時停止やオプション画面などを消すときに使用するのが良いと思います。 - start()
- シーンのアップデートを実行します。
- stop()
- シーンのアップデートをストップします。
- enableStats()
- fpsを表示します。
- enableDatGUI(callback)
- dat.GUIを表示します。
[引数]
callback: dat.GUIを使って、変更させたいパラメータを指定します。
dat.GUIについて、詳しくはdat.guiをご参照ください。
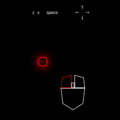
サンプル
ソースコード
// グローバル領域に展開
phina.globalize();

// 定数
const W = 640;
const H = 960;
const LINECORE_X = 320;
const LINECORE_Y = 580;

/*
 * メインシーン
 */
phina.define('MainScene', {
    superClass: 'DisplayScene',
    // コンストラクタ
    init: function () {
        // 親クラス初期化
        this.superInit();

        // スパイラルラインfill用PathShape
        this.path = PathShape({
            stroke: null,
            fill: "#ffffff"
        }).addChildTo(this);

        // スパイラルラインstroke用PathShape
        this.path2 = PathShape({
            stroke: "#ffffff",
            strokeWidth: 1,
            fill: null
        }).addChildTo(this);

        // タイム用ラベル
        this.label = Label({
            x: this.gridX.center(),
            y: this.gridY.span(2),
            fill: "#000000",
            fontSize: 30
        }).addChildTo(this);

        // 一時停止ボタン
        Button({
            text: "stop",
            width: 100,
            height: 50
        }).addChildTo(this)
            .setPosition(this.gridX.span(14), this.gridY.span(0.5))
            .onpush = () => {
                // ポーズシーン生成
                this.app.pushScene(PauseScene());
            };

        // update中の経過秒数計測用
        this.time = 0;
    },
    // 更新
    update: function (app) {
        this.time += app.deltaTime;
        // 経過秒数を取得してラベルで表示
        this.label.text = "シーン開始からの経過秒数:" + (app.elapsedTime / 1000).toFixed(3)
            + "\nupdateされている間の経過秒数:" + (this.time / 1000).toFixed(3);

        const gui = app.guiCtrl;

        // 各オブジェクトの色変更
        this.label.fill = gui.fontFill;
        this.backgroundColor = gui.backgroundColor;
        this.path.fill = gui.lineFill;
        this.path2.stroke = gui.lineStroke;

        // スパイラルライン生成
        this.SpiralLine(app.frame % 360, gui);
    },
    // スパイラルライン
    SpiralLine: function (degree, gui) {
        this.path.clear();
        this.path2.clear();

        this.path.addPath(LINECORE_X, LINECORE_Y);

        let x = LINECORE_X, y = LINECORE_Y;
        let i = 0;
        while (0 <= x && x <= W && 0 <= y && y <= H) {
            x = Math.cos(Math.PI * (degree + i) / 180) * (i / 2) + LINECORE_X;
            y = Math.sin(Math.PI * (180 + degree + i) / 180) * (-i / 2) + LINECORE_Y;

            // dat.GUIのfillにチェックが入っていたら、fill用のPathShapeを描画する
            if (gui.fill) {
                this.path.addPath(x, y);
            }
            i++;
        }
        while (i > 0) {
            x = Math.cos(Math.PI * (degree + i) / 180) * (i / 2) + LINECORE_X;
            // dat.GUIのrandomにチェックが入っていたら、線の幅をランダムにバラけさせる
            const yd = (gui.random) ? (-Math.randint(0, 25) - degree - i) : (-15 - degree - i);
            y = Math.sin(Math.PI * yd / 180) * (-i / 2) + LINECORE_Y;

            // dat.GUIのfillにチェックが入っていたら、fill用のPathShapeを描画する
            if (gui.fill) {
                this.path.addPath(x, y);
            }
            // dat.GUIのstrokeにチェックが入っていたら、stroke用のPathShapeを描画する
            if (gui.stroke) {
                this.path2.addPath(x, y);
                this.path2.addPath(LINECORE_X, LINECORE_Y);
            }
            i--;
        }
    }
});

/*
 * ポーズシーン
 */
phina.define("PauseScene", {
    superClass: "DisplayScene",
    init: function () {
        this.superInit();
        this.backgroundColor = "hsla(0, 0%, 0%, 0.8)";

        // スタートボタン
        Button({
            text: "start"
        }).addChildTo(this)
            .setPosition(this.gridX.center(), this.gridY.center())
            .onpush = () => {
                // 自身を削除する
                this.app.popScene();
            };
    }
});

/*
 * メイン処理
 */
phina.main(function () {
    // アプリケーションを生成
    const app = GameApp({
        // MainSceneから開始
        startLabel: "main",
    });
    // fps表示
    app.enableStats();
    // dat.GUI用パラメータ
    const guiCtrl = {
        random: false,
        fill: true,
        stroke: false,
        fontFill: "#000000",
        backgroundColor: "#aaaaaa",
        lineFill: "#ffffff",
        lineStroke: "#ffffff",
        stop: () => {
            app.stop();
        },
        start: () => {
            app.start();
        }
    };
    // dat.GUI表示
    app.enableDatGUI((gui) => {
        gui.add(guiCtrl, "random");
        gui.add(guiCtrl, "fill");
        gui.add(guiCtrl, "stroke");
        const folder1 = gui.addFolder("Color");
        folder1.addColor(guiCtrl, "fontFill");
        folder1.addColor(guiCtrl, "backgroundColor");
        folder1.addColor(guiCtrl, "lineFill");
        folder1.addColor(guiCtrl, "lineStroke");
        folder1.open();
        const folder2 = gui.addFolder("GameApp");
        folder2.add(app, "fps", 1, 60);
        folder2.add(guiCtrl, "stop");
        folder2.add(guiCtrl, "start");
        folder2.open();
    });
    // 参照用
    app.guiCtrl = guiCtrl;

    // 実行
    app.run();
});
解説
dat.GUI
詳しい説明は、本家様や他の解説サイト・ページ様に解説丸投げします。ちなみに、私はdat.GUI入門のページを参考にさせていただきました。
まず、GameAppの直接のプロパティ以外のパラメータやstop、startイベントを設定して、
// dat.GUI用パラメータ
const guiCtrl = {
    random: false,
    fill: true,
    stroke: false,
    fontFill: "#000000",
    backgroundColor: "#aaaaaa",
    lineFill: "#ffffff",
    lineStroke: "#ffffff",
    stop: () => {
        app.stop();
    },
    start: () => {
        app.start();
    }
};
enableDatGUIメソッドからdat.GUIにセットしています。
app.enableDatGUI((gui) => {
    gui.add(guiCtrl, "random");
    gui.add(guiCtrl, "fill");
    gui.add(guiCtrl, "stroke");
    const folder1 = gui.addFolder("Color");
    folder1.addColor(guiCtrl, "fontFill");
    folder1.addColor(guiCtrl, "backgroundColor");
    folder1.addColor(guiCtrl, "lineFill");
    folder1.addColor(guiCtrl, "lineStroke");
    folder1.open();
    const folder2 = gui.addFolder("GameApp");
    folder2.add(app, "fps", 1, 60);
    folder2.add(guiCtrl, "stop");
    folder2.add(guiCtrl, "start");
    folder2.open();
});
そして、メインシーンからGUIのパラメータの値を呼び出すために、メイン処理のところでappに独自のプロパティを作って、
// 参照用
app.guiCtrl = guiCtrl;
メインシーンのアップデートのところで呼び出して、各オブジェクトのプロパティ値を変更しています。
const gui = app.guiCtrl;

// 各オブジェクトの色変更
this.label.fill = gui.fontFill;
this.backgroundColor = gui.backgroundColor;
this.path.fill = gui.lineFill;
this.path2.stroke = gui.lineStroke;
一部、チェックボックスのものは、SpiralLineのところで、真偽値で描画するか等に反映させています。
// スパイラルライン
SpiralLine: function (degree, gui) {
    this.path.clear();
    this.path2.clear();

    this.path.addPath(LINECORE_X, LINECORE_Y);

    let x = LINECORE_X, y = LINECORE_Y;
    let i = 0;
    while (0 <= x && x <= W && 0 <= y && y <= H) {
        x = Math.cos(Math.PI * (degree + i) / 180) * (i / 2) + LINECORE_X;
        y = Math.sin(Math.PI * (180 + degree + i) / 180) * (-i / 2) + LINECORE_Y;

        // dat.GUIのfillにチェックが入っていたら、fill用のPathShapeを描画する
        if (gui.fill) {
            this.path.addPath(x, y);
        }
        i++;
    }
    while (i > 0) {
        x = Math.cos(Math.PI * (degree + i) / 180) * (i / 2) + LINECORE_X;
        // dat.GUIのrandomにチェックが入っていたら、線の幅をランダムにバラけさせる
        const yd = (gui.random) ? (-Math.randint(0, 25) - degree - i) : (-15 - degree - i);
        y = Math.sin(Math.PI * yd / 180) * (-i / 2) + LINECORE_Y;

        // dat.GUIのfillにチェックが入っていたら、fill用のPathShapeを描画する
        if (gui.fill) {
            this.path.addPath(x, y);
        }
        // dat.GUIのstrokeにチェックが入っていたら、stroke用のPathShapeを描画する
        if (gui.stroke) {
            this.path2.addPath(x, y);
            this.path2.addPath(LINECORE_X, LINECORE_Y);
        }
        i--;
    }
}
フレーム数
スパイラルライン生成時、引数に、dat.GUIのパラメータ値を調べるための変数と一緒に、その時点でのフレーム数を360で割った余りをスパイラルライン全体の基準の角度として渡しています。これで1フレーム毎に少しずつ回して変化させています。
// スパイラルライン生成
this.SpiralLine(app.frame % 360, gui);
ちなみに、PathShapeについては、以前書いてみた記事がありますのでよろしければこちらをご覧ください。
経過秒数
経過秒数の表示でシーン開始からの秒数と、update中の秒数を2つあるのは、
一時停止したり、GUIのパネルからの操作でupdateをstopしたりした場合でも、app.elapsedTimeの秒数は増え続けるため、
updateしている間だけの経過秒数を計測するための方法として、app.deltaTimeで取得した1フレーム毎の経過秒数をthis.timeに加算するというやりかたとの比較として並べる為に2つ表示しています。
this.time += app.deltaTime;
// 経過秒数を取得してラベルで表示
this.label.text = "シーン開始からの経過秒数:" + (app.elapsedTime / 1000).toFixed(3)
    + "\nupdateされている間の経過秒数:" + (this.time / 1000).toFixed(3);
シーン生成、消去
また、ポーズシーンによる一時停止は、alkn203氏の[phina.js-Tips] Sceneをプッシュしてポーズ画面を作成するを参考に(ほぼパクリ)させていただきましたので、ここでひっそり感謝(と謝罪)を申し上げさせていただきますm(_ _)m
メインシーンの方で、一時停止ボタンが押された時に、ポーズシーンを生成し、
ポーズシーンでスタートボタンが押された時に、ポーズシーンを消すようにしています。
// 一時停止ボタン
Button({
    text: "stop",
    width: 100,
    height: 50
}).addChildTo(this)
    .setPosition(this.gridX.span(14), this.gridY.span(0.5))
    .onpush = () => {
        // ポーズシーン生成
        this.app.pushScene(PauseScene());
    };
/*****
 * 略
 *****/

/*
 * ポーズシーン
 */
phina.define("PauseScene", {
    superClass: "DisplayScene",
    init: function () {
        this.superInit();
        this.backgroundColor = "hsla(0, 0%, 0%, 0.8)";

        // スタートボタン
        Button({
            text: "start"
        }).addChildTo(this)
            .setPosition(this.gridX.center(), this.gridY.center())
            .onpush = () => {
                // 自身を削除する
                this.app.popScene();
            };
    }
});ご意見・ご感想、また、ここ間違ってるよとか、もっといい方法あるよといったご指摘などございましたら、お手数ですがコメント欄や当twitterアカウントへお願いしますm(_ _)m
参考にさせていただいたサイト・ページ一覧
phina.js/baseapp.js at develop – phinajs/phina.js – GitHub
[phina.js-Tips-46]ゲームの経過秒数を取得する
[phina.js-Tips] Sceneをプッシュしてポーズ画面を作成する
GitHub – dataarts/dat.gui: dat.gui is a lightweight controller library for JavaScript.
dat.GUI入門
関連記事:
 [phina.js] PathShapeについて
 [phina.js] サウンドの操作について
 [phina.js] マウス・タッチ・キー入力取得 マルチタッチ入力(touchList・pointers)編
 [phina.js] マウス・タッチ・キー入力取得 Accessory系(ドラッグ・フリック)編
 phina.jsとThree.jsの連携について
 [phina.js] マウス・タッチ・キー入力取得 基本編
 [phina.js] マウス・タッチ・キー入力取得 入力の種類と座標取得編
 [phina.js]基本 — 色んな図形オブジェクトについて
 [phina.js]オブジェクトの操作 -位置、移動、衝突・クリック判定など- について
 [phina.js]基本 — ラベルオブジェクトについて